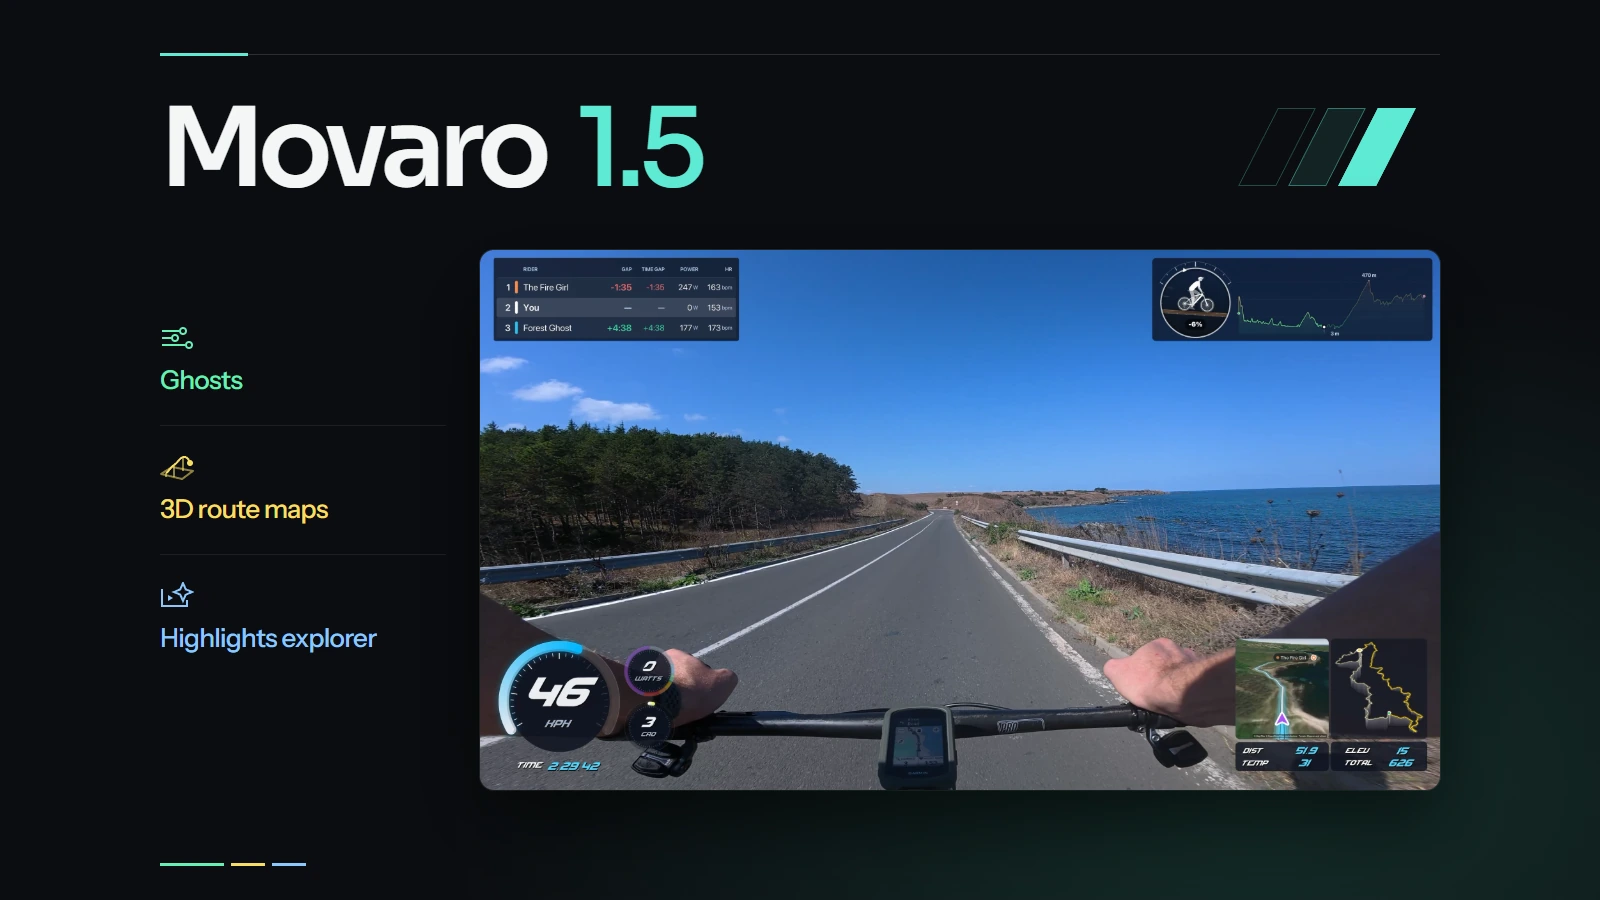
Movaro 1.5 puts more of the ride into your video. With Ghosts, you can compare your activity with a previous attempt or with recordings shared by other participants, then show their positions and gaps alongside your footage. Route maps can now be drawn in 3D, from a tilted relief of the whole route to a chase camera that follows you along the road.
The release also introduces Highlights explorer, a separate Highlights reel export, new looks for maps and gauges, zones that colour a reading by its band, and a Cycling (MTB) figure for the slope indicator. Manual Highlights and the new visual presets are included on every plan.

Compare the efforts behind the footage
Open Tools → Ghosts and add up to five recordings from GPX, FIT or TCX files, or from your own connected Strava account. Choose Same event when the recordings belong to the same outing, or Past effort to compare attempts made on different days. To line a ghost up, pause your video or timeline where you ride together, such as the start line, a summit or a frame where they are beside you, then use Line up on the video. Nudge the ghost by one or five seconds while the map and a live gap follow playback. Specific moments or laps can still be matched by hand.
That gives you a few ways to tell the story. Compare a run with an earlier attempt on the same course. Add a friend's shared recording to see where the gap opened on a ride. For a race, show how the selected participants move relative to one another while you play or scrub the footage.

Ghosts appear on the project map and can be added to route and elevation overlays, including the new 3D maps. The Ghost Comparison panel offers a table, leaderboard, head-to-head view or gap bar. Choose a time or distance gap and the readings that matter, then place the panel on the preview. Against a past effort, the head-to-head view shows how far ahead or behind you are, in seconds and metres, with both speeds side by side. You can also build individual telemetry elements for each participant when their recording contains the data.

The comparisons stay tied to the original activity moment through cuts, reordered highlights and exports. A replay of a pass shows the comparison for that pass.
Ghosts compares the recordings you add; it doesn't discover other people's Strava activities or reconstruct an entire race field. Gaps need both recordings to cover the same course; missing GPS or a different route can leave a gap unavailable. Race position remains a separate tool for manually recording passes you see in the footage, and its text labels can now replace just the position or just the total, as in “Leading group / 500”.
Draw the route in 3D
New looks draw your route map in 3D, raised by your recording's own climbs or laid on the real terrain under satellite imagery. Relief and Ridge tilt the whole route and raise it by its climbs, with a curtain down to its shadow. Rider View looks from your shoulder along the road to the horizon, with the climbs ahead rising as hills. Chase rides behind you and turns with the road.
For a racing-game feel, Street Radar and Pursuit Radar are minimaps that turn with your heading, with a north marker and a square or round frame. In every 3D look, the road and your marker lie on the ground in perspective, wide at your feet and narrowing into the distance. Ghost markers, glows and the travelled-route styling work in 3D as well.
To show the landscape you rode through, set Ground to Terrain to lay the route on the real hills and valleys around it, or to Satellite to see them under satellite imagery. The Satellite and Flyover looks start there. The first time, Movaro downloads the map data for your route's area and shows its progress; after that, previews and exports use it, even offline. For finer detail in an export, turn on Download high-detail map under Options.

Choose a 3D look in the map's Look section, then adjust the camera, tilt, range or rotation, height, fog, frame and ground under 3D view. 3D maps are available on Creator, Studio and Founder; on other plans, the same map previews and exports flat.
Find the moments worth keeping
A long ride can leave hours of footage and only a few minutes worth sharing. Your camera doesn't know where the ride got interesting, but your activity does: the steepest descent, the hardest effort, the moment you took the lead. Highlights explorer reads it to point you to the footage worth keeping, so you start from a shortlist instead of scrubbing through every file.
Open Tools → Highlights explorer. Movaro finds the climbs, descents, sprints and sustained efforts that your footage covers and suggests a clip for each. Suggestions appear as they are checked. Search, filter, sort or group them, then click one to watch its footage and adjust the start and end. The project map zooms to that part of the route.
AI review
AI review is currently available only for activity files you upload: GPX, FIT or TCX. It helps rank the suggestions so the strongest moments come first, and shows how confident it is in each one. Your videos, frames, GPS coordinates, activity names and file paths stay on your device; optional AI review needs an internet connection.

Every suggestion explains itself. “19 m of descending over 20 seconds” comes with its evidence (Top 2% speed, a 41 km/h peak, a -10% grade), the suggested clip within the whole effort (“12s of the 20s descent”) and the AI confidence. Nothing reaches your edit until you add it.
For activities imported from Strava, Highlights explorer still finds and ranks moments, without AI review. To use AI review for one, import your own recording of the activity (GPX, FIT or TCX) in Highlights explorer; only that file is reviewed, never the Strava data.
From the moments to the reel
Choose which moments belong in your edit and add them to Highlights, individually or together. Review each moment in the project's preview, then export the Highlights reel on its own when that's the video you want to share. It keeps your highlight trims, camera views, audio and overlays, and saves to the project's Exports/Highlights folder. To export just one or a few, check them in the Highlights list and press Export.
With reviewed Ghosts in the project, Highlights explorer also finds where the race changed: overtakes, times you were passed and finishes covered by your footage. They appear as Ghost race moments that say what happened, such as “You passed Forest Ghost after 39 min behind, moving up to 1st of 3.” They are calculated from the recordings, so review the footage before using them to describe what happened on camera.

Highlights explorer is included with Creator, Studio and Founder. Creator includes AI review for 5 activities per rolling 30 days; Studio and Founder include 60. When that allowance is used, Highlights explorer keeps finding moments and your saved suggestions stay, so you can keep editing and exporting Highlights until AI review is available again.
Ghosts is also available on Creator, Studio and Founder. You can mark, trim and arrange Highlights yourself on every plan, including Free.
Give the route its own look
Route maps and elevation profiles have new preset looks you can choose on every plan. Use Navigator for a navigation-style route with start and finish markers, Neon for a glowing line, Minimal for just the line, or Sunset for a warm gradient. For elevation profiles, Silhouette fills the hills as you ride and Summit adds altitude colours and labels.

Style Ghosts markers with their own shapes, colours and labels to keep the comparisons readable. Corner radius rounds the panels behind meters, graphs, grade bars, icons and compasses with the same control used for maps and comparison panels. Zoomed elevation profiles also scale their height to the part of the profile on screen, so a climb stays visible in a short, wide profile.
Style the readings as well as the route
Pick a Look for a semi-arc gauge, metric ring, meter, grade bar or slope indicator from tiles rendered with your activity data. Chrono adds a watch-style dial; Halo gives a metric ring a glowing edge. Start with a preset, then adjust details such as the glow, needle, segments and tick marks under Finishing touches.

Use Zones to change the colour of a reading as it crosses a band. Start from heart-rate zones based on your maximum, power zones based on your FTP, or bands for the gradient, then adjust them. A metric ring or meter can Fill from zero, with its own Below zero colour: a descent can sweep in the opposite direction from a climb. These looks and controls are available on every plan; the readings depend on the data in your activity.

Put the slope in the scene
The slope indicator's Cycling (Road), Runner and Skier figures have been redrawn, and a new Cycling (MTB) figure rides a full-suspension bike on a dirt trail. Turn on Road and scenery to add the road, hills and sky around the figure. Static figures and scenery are included on every plan.
With Animate movement on Creator, Studio or Founder, the figures move and the scenery scrolls with your activity. Cyclists can follow recorded cadence when it's available, and the dial moves smoothly between grade readings.

Layouts that include Ghosts, 3D maps, the new map, panel or gauge styling, or the Cycling (MTB) figure need Movaro 1.5 or later. Shared layouts carry the design and participant slots; they don't include the activity recordings used to make them.
Picture-in-picture, ranges and a smoother editor
Sync video and route now starts by asking What do you want to sync?: the video at the timeline marker, your activity videos or a picture-in-picture track. Picture-in-picture videos can be matched with the Main edit or the route map, then corrected one at a time, as a selection or as a whole track. Movaro previews the moved clips before you apply the offset and keeps your trims. When you add picture-in-picture videos, Fine-tune timing (optional) lets you nudge the offset or match a paused frame to the playhead before the track is added.
A picture-in-picture can also carry a Telemetry tag with up to three of its rider's readings, such as speed, heart rate, power or the time gap. Choose your own data or a ghost's, and a strip, chip or text style in any corner; the tag moves and fades with the picture.
To export just part of a timeline, Shift-drag on the timeline ruler to set a range, or press [ and ] at the playhead, then choose Range under Length in the export settings. Add range to highlights turns the same stretch into a highlight.
Overlays keep running through pauses in your recording: elapsed time keeps counting and totals such as distance hold their value instead of going blank.
The editor is more responsive, especially on macOS. Switching between previews, selecting a video during playback and redrawing timeline thumbnails no longer hold up the whole window, and edits in large projects update the preview with less waiting. On Windows and macOS, scrubbing a source video stays smooth and settles on the exact frame when you let go.
An empty timeline can take all your source videos in one step. If a footage folder moves, relink the folder as a whole instead of repairing each video. Edit layout in the preview header opens the layout the preview draws, and FIT recordings can now add Respiration Rate, Grit and Flow to your overlays.
See the complete release notes for the other changes and the plan comparison for feature access. To try the workflow, open an activity with synchronized footage, compare a recording in Ghosts, switch a route map to a 3D look, then review a few moments in Highlights explorer.